• Skip to primary navigation
  • Skip to main content
  • Skip to primary sidebar
  • Skip to footer

Insight Home Inspection Inc.

Just another Home Inspector Pro Sites site

  • Home
  • About
  • Testimonials
  • Book an Inspection
  • Contact Us
  • Education
  • Sample Report
  • Links

Ten Tips to Speed Up Your Home Inspection

January 25, 2017 by insighth

living roomSpeed up your home sale by preparing your home ahead of time using the following tips. Your home inspection will go smoother, with fewer concerns to delay closing.
  1. Confirm that that the water, electrical and gas services are turned on (including pilot lights).
  2. Make sure your pets won’t hinder your home inspection. Ideally, they should be removed from the premises or secured outside. Tell your agent about any pets at home.
  3. Replace burned-out light bulbs to avoid a “light is inoperable” report that may suggest an electrical problem.
  4. Test smoke and carbon monoxide detectors, and replace dead batteries.
  5. Clean or replace dirty HVAC air filters. They should fit securely.
  6. Remove stored items, debris and wood from the foundation. These may be cited as “conducive conditions” for termites.
  7. Remove items blocking access to HVAC equipment, electrical service panels, the water heater, attic and crawlspace.
  8. Unlock any locked areas that your home inspector must access, such as the attic door or hatch, the electrical service panel, the door to the basement, and any exterior gates.
  9. Trim tree limbs so that they’re at least 10 feet away from the roof.  Trim any shrubs that are too close to the house and can hides pests or hold moisture against the exterior.
  10. Repair or replace any broken or missing items, such as doorknobs, locks or latches, windowpanes or screens, gutters or downspouts, or chimney caps.

Checking these areas before your home inspection is an investment in selling your property.   Your real estate agent will thank you!

Dealing With Two-Pin Ungrounded Systems In Older Homes

January 25, 2017 by insighth

unground outlet
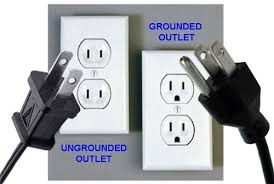
Home constructed prior to 1965 in the United States may still be equipped with the original style two pin ungrounded outlets. Ungrounded receptacles are less safe than modern grounded system three-pin receptacles. If current leaks to metal, unintended current paths in appliances, or the house systems, the energized component or appliance can increase the risk of electrical shock and fire. A grounded electrical system and receptacles provides increased protection against electric shocks, fire, and also decreases the risk of damage to appliances in case of a ground fault-current leaking outside the intended path.

The ungrounded two-pin receptacles are outdated by modern standards, and do not provide a path for static electricity for modern computerized components and most surge protectors will not work on two pin receptacles. Some homeowners use a two to three pin adaptor known as “cheater plug” as a quick alternative to installing grounded receptacles. However, this does not provide complete protection similar to properly installed grounded outlets. Another common layperson practice is replacing ungrounded  tow-pin receptacles with modern receptacles that have a third slot for the ground pin, but with no equipment grounding conductor connected to the new receptacle. This displays a false indicator of safety and does not provide adequate protection from the risk of electrical shocks and fire.

Upgrading the electrical system will not only bring it close to modern only bring it closer to modern safety standards but will of an older home. Some of the other measures you can take to properly ground your receptacles include the following:

Installing three-pin receptacles and completely re-wire the electrical system so that a path to the source via equipment grounding conductor is provided to the receptacle.

Installing GFCI’s (ground-fault circuit interrupters) in the home. These three-pin devices can be installed in place of two pin receptacles a the receptacle itself of upstream. GFCI’s will provide additional protection against electric shocks even if you do not re-wire your home. If not grounded, GFCI devices and the protected receptacles are required to be labeled “no equipment ground.” These labels normally come with the devices. Note that ungrounded three-pin GFCI receptacles do not provide a path for static electricity or surge protectors. Be sure to utilize devices designed for two-wire ungrounded systems.

CAUTION!

Homeowners should never attempt to modify electrical wiring of the home themselves if there is any question regarding proper procedures or parts. Electrical work should only be done by qualified and licensed electricians, and in some cases local regulation requires it. Any attempt to “ground” the receptacles to a grounding electrode rod, the neutral conductor, or metallic water line can be dangerous. Most any electrical modification will require that you obtain a municipal permit from your local building and safely department, and have an inspection by the municipal inspector.

Garage Vehicle Door Maintenance

January 25, 2017 by insighth

garage vehicle door
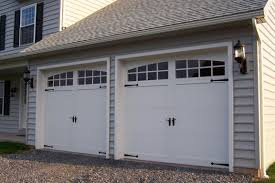
Garage vehicle doors are a large moving object and it is essential that they be well maintained and in good working condition. Regular maintenance of your garage doors not only extends the life of the garage door but also ensures reliable, quiet, and safe operation of the door. Many homeowners opt for regular inspection and maintenance of vehicle doors by a qualified professional due to their size and complexity. Here are some of the important steps that you can take to keep your garage doors in good working condition.

  1. Annually, lubricate opener chain or screw with a minimal amount of white lithium grease. This will extend the life of both the opener and the chain. Be sure to check the owner’s manual as some door opener chains do not require lubrication.
  2. Use a penetrating lubricant or oil to coat the overhead torsion springs mounted above the roller tracks. Coating torsion springs with cleaner or lubricant helps prevent corrosion of the springs.
  3. Consider replacing the weather seal of the garage door bottom and sides if it has become worn or brittle. Remove old seal with a flat pry bar and place a new one in its place. Note there are differing connection methods for door seals so be sure to purchase the correct seal for your door.
  4. Visually inspect nylon rollers of the garage door for cracks, chips, or missing rollers. On steel rollers, wear and tear of the bearings would indicate whether it would need replacement, usually they will be out of camber if falling. You can purchase replacement rollers from most hardware stores. Installing the replacement rollers is not extremely difficult. Just remove and reinstall the roller bracket to install the new rollers, one at a time.
  5. You can test the balance of your door by ensuring that it holds halfway open without assistance. Disengage the electric opener first if one exists. If the door is not balanced, it will result in wear and tear of the garage door and opener. You can contact a garage door professional to balance the garage door if it does not stay in position when half open, which could indicate a detective spring or other issue.
  6. You might consider installing a lift handle on both sides of the garage door if sectional type. When installed, you are less likely to place your fingers between sections to lift the garage door and avoid pinching.

Fireplace Maintenance

January 25, 2017 by insighth

fireplace
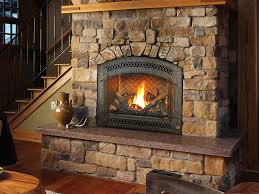
A fireplace can provide warmth to a room and can increase aesthetic appeal. Here are some tips to ensure that your fireplace remains in good working condition and keeps burning safety.

  1. Hire a professional to sweep the chimney at least once a year if you use your fireplace often. Every 3-5 years if the unit is used occasionally will suffice.
  2. Regularly inspect the cap located on the chimney. You can usually do this from the ground with binoculars. The cap keeps rain and animals out of the chimney. You should calla professional to replace the chimney cap if necessary.
  3. Inspect the interior of the fireplace for build-up of soot and creosote. Soot and creosote accumulates inside the chimney due to the normal process of burning  wood. They are flammable and therefore should be swept clean as soon as they build up inside the fireplace. Also check the firebox for any cracks or deteriorated components and have them repaired quickly. A chimney sweep can generally provide any fireplace services other than re-building the entire unit.
  4. Consider using dry hardwoods like oak, ash, and birth in the fireplace. These hardwoods burn long and hot and tend to produce less soot and creosote.
  5. If your chimney is older and make of brick consider installing a stainless steel liner in the fireplace chimney  that has the ability to withstand high temperatures. A chimney sweep can assist with determining the proper type and material.
  6. Consider installing heat resistant glass doors to help prevent heat loss from the house. You can also add a  blower that will help direct heat into the room instead of most of it going up the chimney.
  7. Adding the glass door also helps prevent hot embers from entering the room. Keep the glass door clean using fireplace glass cleaner and a paper towel.
  8. Regularly clean the interior of the fireplace of ash with a shovel then with a vacuum. Wear gloves and a dust mask when cleaning the fireplace.
  9. Don’t store fuel close to the fireplace where it might ignite. Keep children away from solid fuel fireplaces and gas appliances.

Smoke and Carbon Monoxide Alarm Maintenance

January 25, 2017 by insighth

smoke alarm
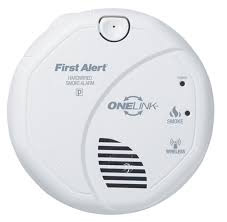
Smoke and carbon monoxide alarms are essential home safety equipment that help minimize the risk of smoke and poison gas to humans by alerting their presence. Here are some tips to ensure that your alarms remain in good working condition.

  1. Check and test your alarms every month to ensure that they are in good working condition. Most hard-wired models have a green light to indicate the unit is powered and operational. Be sure your smoke alarm is a newer model that is a photoelectric sensor type, not the older lonization type. Photoelectric alarms are more sensitive to smoldering fires rather than flaming fires. Some alarms contain both technologies. Be sure all smoke and CO alarms have fresh batteries. Discard and replace any alarms more than 10 years old.
  2. Clean the alarm with a vacuum cleaner every six months. This will remove dirt and dust that may hinder performance of the alarm.
  3. If the alarm uses an alkaline battery, you should replace it every year, Lithium batteries work for a long time and should be replaced after about 10 years. Many alarms now have a permanent battery and require complete replacement every 7 to 10 years.
  4. Consider replacing your smoke alarms every 10 years. The sensitivity of the smoke alarm reduces during the lifespan of the smoke alarm. Some Manufacturers place an expiration date on the smoke alarm. You should replace the smoke alarm at the end of the expiration period.
  5. Be sure you have smoke and carbon monoxide detectors in all sensitive locations as determined by local building codes and the alarm manufacturer. Common locations are inside bedrooms and hallways outside bedroom, as well as the top of stairways at every level.

Flexable Duckwork A Problem

January 25, 2017 by insighth

Old-school ribbed or flexible ducts are a bad idea. Flex hose can tear on nails or become compressed, kinked, or bent. It’s also dangerous : in dryer exhaust ducts, lint can collect inside the ribbing and cause a fire.

The best exhaust paths are made using solid, smooth ducting. Ideally, you want metal ducting that vents directly to the outside in as short and straight a run as possible. That way, the fan will work efficiently. If the exhaust duct has to make a lot of turns or go a long distance, you may need a fan with a larger capacity. I ducts run through unheated spaces, make sure the ducts are insulated and securely sealed at every seam. Without this, the cold air surrounding the ductwork will cause condensation and leaks.

Clothes dryer have an exhaust duct that lets the warm, moist air and lint from the dryer escape to the outside of the home (never vent it into an attic or crawl space –guaranteed mold and damage). The problem is the exhaust duct gets clogged. The lever of clogging varies between types of dryers and manufacturers, and depends on how often the duct is cleaned. (You do clean your dryer exhaust duct, right? I recommend it at least once a year) If your get a blockage, you’ve got a risky situation. When hot exhaust passes through a duct caked with all those bits of lint, it could end up triggering a house fire.

The other issue is lint gets past the dryer screen and gets caked on the inside of a dryer’s exhaust and flex tubes. Fabric softeners, dryer sheets, and anti-static products can make the problem even worse. The lint buildup reduces the performance and efficiency of your dryer–which means you’re paying more for it to work less effectively — and you’re increasing the risk of a lint fire. Do yourself and your family a big favor and use smooth, rigid metal ducting. Don’t connect it with screws because they poke through on the inside and catch lint.

Primary Sidebar

Contact Info

Insight Home Inspection Inc.
14615 La Condesa Dr
La Mirada, CA 90638
insightinspection@gmail.com
(213) 798-6568 (714) 288-9885

Education

WHAT CAUSES CRACKS IN A DRIVEWAY?

Everyone notices cracks in their driveway. Weeds pop up and anthill mounds spill out of the crevices. Most driveway cracks are small and considered non-structural, but cracks with wider openings and heaved edges can be trip hazards and should be repaired.     A driveway or walkway can crack for several reasons: •Tree roots can…

Read More

Curb Appeal

For decades, realtors have talked about “curb appeal” when rating a house’s attractiveness to buyers when they first drive up to it. It’s a quality that can be seen from the street, and can either captivate potential buyers or discourage them from even setting foot in the house. Curb appeal is important not just for…

Read More

A Green Home Checklist

Make Your Existing or Future Home a Greener Place to Live THE RIGHT SITE A site with smart landscaping is important to help make your home comfortable, affordable and attractive. Water-efficient bermuda or buffalo grass is planted in sunny areas. Plants, shrubs and trees that grow successfully in Northern California. Gutters and downspouts direct water…

Read More

Footer

Expert Answers

WHAT CAUSES CRACKS IN A DRIVEWAY?

Everyone notices cracks in their driveway. Weeds pop up and anthill mounds spill out of the crevices. Most driveway cracks are small and considered non-structural, but cracks with wider openings and heaved edges can be trip hazards and should be repaired.     A driveway or walkway can crack for several reasons: •Tree roots can…

Read More

Latest from the Blog

The Best Way To Deal With Mice

Mice find their way into home looking for 2 things; warmth and food. Cold weather often drives them indoors to find shelter, and our homes look that much more enticing if they can find a food source. They gen in through cracks and anywhere there’s a gap: around vents, wires, pipes, windows and doors. Mice…

Read More

Calender

January 2017
M T W T F S S
 1
2345678
9101112131415
16171819202122
23242526272829
3031  
« Dec   Feb »

Copyright © 2025 Insight Home Inspection Inc.. All rights reserved.

  • Home
  • About
  • Testimonials
  • Book an Inspection
  • Contact Us
  • Education
  • Sample Report
  • Links